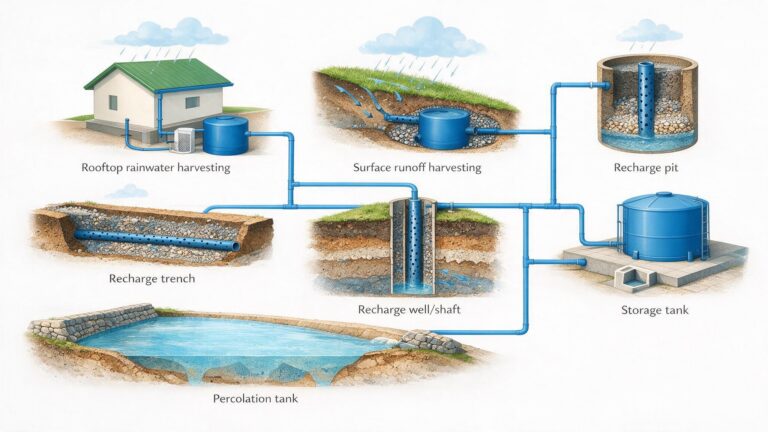
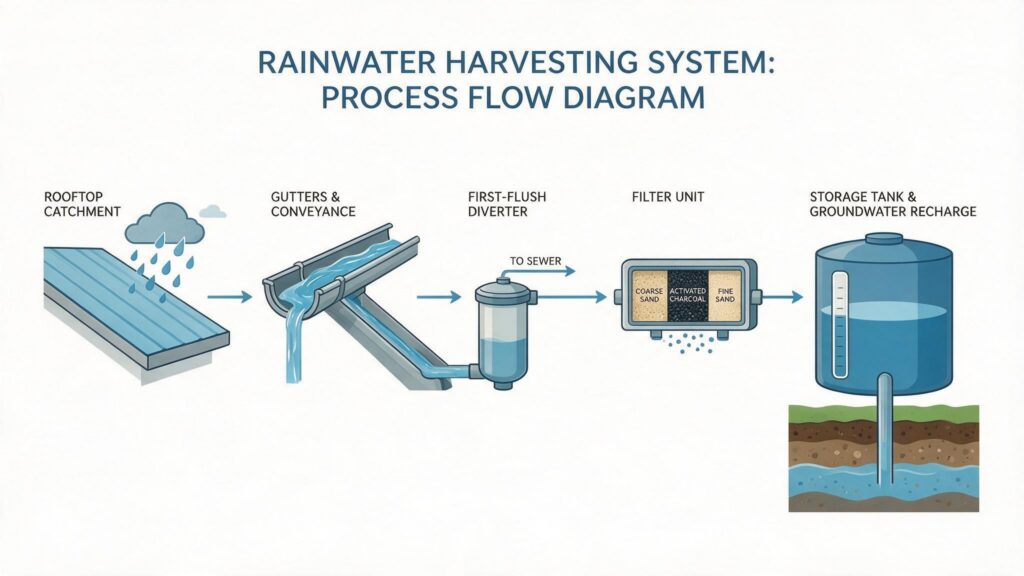
Most explanations of rainwater harvesting jump straight to the finished system — roof, gutters, tank, done. That skips the part that actually determines whether the system works: the process of getting there. Here’s what happens, in order, from the first decision to the first monsoon the system actually handles.
Step 1: Assess the Site
Before anything is designed, three numbers need to be known: the catchment area (usually the roof, measured in square metres), the average annual rainfall for the location, and the depth to the water table on that specific plot. In Nagpur and the wider Vidarbha region, average annual rainfall runs around 1,100mm, which is enough to make even a modest roof worth harvesting. This is also the stage where soil type gets checked — sandy soil percolates fast and favours a recharge pit, while denser clay soil may push the design toward a deeper recharge well instead.
Step 2: Calculate Harvesting Potential
With catchment area and rainfall known, potential yield is estimated using a simple formula: roof area (in square metres) × annual rainfall (in metres) × a runoff coefficient that accounts for water lost to evaporation and surface absorption (typically 0.8–0.85 for a hard roof). A 100 sq. m roof in Nagpur, for instance, can realistically harvest well over 80,000 litres across a monsoon season. This number is what determines tank size and whether a recharge structure alone is enough, or whether storage for actual use makes sense too.
Step 3: Choose the Structure
This is where the site assessment turns into a design decision — rooftop catchment paired with a storage tank, a recharge pit, a recharge trench, or a recharge well, based on available open space and depth to groundwater. Our guide to the seven types of rainwater harvesting walks through what each structure involves and when it fits.
Step 4: Install the Catchment and Conveyance
Gutters are fitted along the roof edge, sized to the roof area so they don’t overflow during heavy bursts, and connected to a downpipe that carries water down to ground level. This part of the system is mechanically simple but gets skipped over in cheap installations more often than any other step — undersized gutters are one of the most common reasons a system underperforms even when the storage or recharge structure downstream is built correctly.
Step 5: Fit the First-Flush Diverter and Filter
The first flush of any rainfall carries dust, leaves, bird droppings, and pollutants that have settled on the roof since the last rain, and a first-flush diverter is a simple valve that discards this initial flow before it enters the system. What follows passes through a filter — a layered sand and gravel filter, a charcoal filter, or a proprietary self-cleaning mesh filter — before reaching storage or a recharge structure. Skipping this step is the single biggest cause of contaminated storage tanks and clogged recharge pits.
Step 6: Build the Storage or Recharge Structure
Depending on the design chosen in Step 3, this is either a storage tank (RCC, ferrocement, or durable plastic, sized to the calculated harvesting potential) or an excavated recharge pit, trench, or well backfilled with graded boulders, gravel, and sand. An overflow outlet is built into every storage tank design so that once it’s full, excess water is diverted to a recharge structure rather than simply spilling onto the ground.
Step 7: Test and Commission
Before the system is considered complete, it should be checked through at least one real rainfall: gutters shouldn’t overflow, the first-flush diverter should actually discard water before the main flow starts, and there should be no visible leakage at tank joints or around the recharge structure. This is also when documentation gets filed for any applicable approvals — see our guide on how CGWA NOC and rainwater harvesting connect if the property involves groundwater extraction.
Step 8: Maintain It
A rainwater harvesting system isn’t a one-time build. Filters need periodic cleaning, first-flush diverters need to be reset before each monsoon, and storage tanks need an annual check for silt buildup. Our maintenance guide covers what needs attention and how often.
These Principles Are Older Than the Materials
The site-assessment logic behind this process has deep roots — see our guide to 3 traditional rainwater harvesting methods in India for how similar principles were applied centuries before modern materials existed.
Frequently Asked Questions
How long does the whole process take, from assessment to a working system?
For an individual home, a straightforward rooftop-plus-recharge-pit system typically takes a few days once the design is finalised — most of the time in the overall process actually goes into the site assessment and approvals stage, not the physical construction.
Does the process change for an existing building versus new construction?
The steps are the same, but retrofitting an existing building usually means working around finished roofing and existing drainage, which can affect where gutters and the recharge structure can practically go. New construction has the advantage of planning the catchment and recharge structure into the building’s layout from the start.
What’s the most commonly skipped step?
The first-flush diverter, by a wide margin. It doesn’t affect whether water reaches storage, so it’s easy to leave out under time or budget pressure — but it’s the single step most responsible for water quality once the system is running.